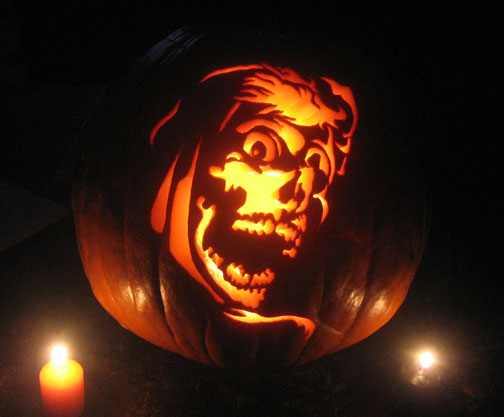
How to Carve a Jammin' Pumpkin!
So I have the stencil, now what? Before starting, be sure to allow yourself plenty of time to carve. Don't wait until the sun is almost down on Halloween night to start the process. A Jammin' Pumpkin will only be truly jammin' if time and care is given during the carving process.
Step 1: Make a Jammin' Carving Tool
There are several tool kits out there that have cheap-o plastic handled saws. Those work OK, but JP recommends making your own carving tool. It's really simple, here are the tools you will need. Needle-nose pliers with a cutting tool, an x-acto knife handle and a pack of #12 scroll saw blades. You probably already have the pliers and x-acto knife lying around in a tool box or junk drawer. Scroll saw blades can be found at just about any hardware store, they are pretty cheap.

Using the cutting tool on the pliers, cut the scroll saw blade at whatever length you think you will need to get through the pumpkin. Also, angle the cut such that you end up with a point on the blade.
Next, simply insert the non-pointed end of the scroll saw blade into the x-acto knife handle and get it as tight as possible.
And that's it, you're done! Time to carve a pumpkin. Hey look, there's a pumpkin, let's carve it!
Step 2: Collect Your Tools

Here are all the tools I use for carving. The Jammin' Carving Tool, a scraping tool, a poking tool and a serrated kitchen knife. We have covered the carving tool already. As for the scraping tool and poking tool, again you can find versions of these in store-bought carving kits, but JP recommends the pictured tools here, they can be found in a basic clay modeling kit. They are sturdier and have larger handles than the cheap-o's. You can find this kit in any hobby store. As for the kitchen knife, any one will do. Obviously, you will need a pumpkin and your desired Jammin' Pumpkin stencil. Match your selected stencil to an appropriately sized and shaped pumpkin. A tall skinny pattern will need a tall skinny pumpkin. A short wide stencil will need a short wide pumpkin. Also, don't worry about blemishes in the pumpkin face, you will never see them once the design is carved, lit and on display Halloween night.
Step 3: Transferring the Pattern

Cut away the excess paper around the pattern. Using the kitchen knife, cut open the pumpkin's lid. Make sure you determine where the best "face" is on the pumpkin and leave enough room for the pattern. Scrape away ALL of the inside walls of the pumpkin, not just behind the "face" of the pumpkin. Continue thinning the face down to about an inch or less. See how well this scraping tool works? It's way better than anything I have ever used.

Use the poking tool to transfer the pattern. Poke holes all the way around the shapes of the pattern. Here is the pattern, still attached, and all the holes poked. For the more detailed sections, the holes are closer together, and the less detailed sections, the holes are farther apart. And here is the pumpkin after removing the pattern. The holes are tough to see, but trust me they are there. Keep the pattern handy for reference while carving.
Step 4: Carving
Use the carving tool and connect the dots. There are two general rules of thumb for carving... One, start in the middle and work your way out. Two, start with small cutouts, then go big. Every design will require some forethought to where is the best place to start. You may notice I carve some large pieces before some other small ones. It all depends on the design. Here, I'm starting with the smallest details. When carving, be sure to use a good up and down sawing motion. You don't really want to cut, you want to saw. The Jammin' Carving tool will make these small details easy. Also, because this tool is so much thinner than store-bought carving tools, you can twist the tool without breaking it. It may take a while to get the hang of this tool, but once you do, it's great.

Next, I complete the center of the design. I went from small cutouts to large ones. Next I carved the jaw. Again, small first then large. last was the top of the head and the hood around the jaw. Here I carved the hair section first even though it was a large piece. I did this because it would have been surrounded by other cutouts, which makes carving more difficult.
Step 5: Light it Up!

Rinse off any residue left from carving and clean up the insides. Then put in a candle and be the envy of your neighborhood! Now THAT'S a Jammin' Pumpkin!.